# 前言
真的太开心了,查阅了很多文档终于解决了这个问题。
事情的起因是由于我在项目中使用了 MixedReality-WebRTC 库实现与 Web 端的实时音视频通讯,同时呢,还在项目中使用了 Unity 封装好的 Windows API 实现图像捕获功能(详情可看:Hololens - 捕获照片到内存并上传至服务器(unity)),并将图像数据上传到云端。在实践的过程中就出现了问题了,它俩居然是冲突的 emmmm
当 HoloLens2 在和 Web 端进行实时音视频通讯的时候,如果我使用了图像捕获功能,程序就崩溃了,呜呜呜,我就猜想原因可能就出在对相机资源的抢占上吧
好在天无绝人之路,我无意中发现,当在使用 MixedReality-WebRTC 库的时候,如果使用基于 Unity 封装好的 Windows API 来捕获图像会一直失败,但是调用系统相机拍照功能,居然不会冲突,可以在实时音视频传输的同时拍摄图像,诶这就有点意思了
开始查阅资料,重新细读了 HoloLens2 官方文档中的 可定位相机 这篇文章,这可真是给了我大大的帮助啊
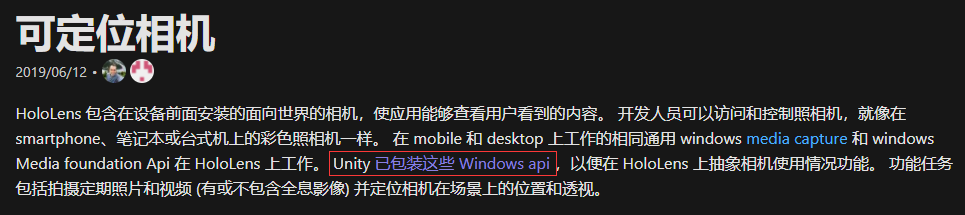
首先我了解到我之前使用的一直与 WebRTC 冲突的图像捕获功能是基于 Unity 封装好的 Windows API,如下图
然后,我又在 面向开发人员的 Mixed Reality 捕获 这篇文章中,发现 HoloLens2 是可以共享对相机的访问的(我之前开发过 HoloLens1 代,就遇到过对相机资源的抢占这种情况,对这个问题印象就比较深刻),如下图
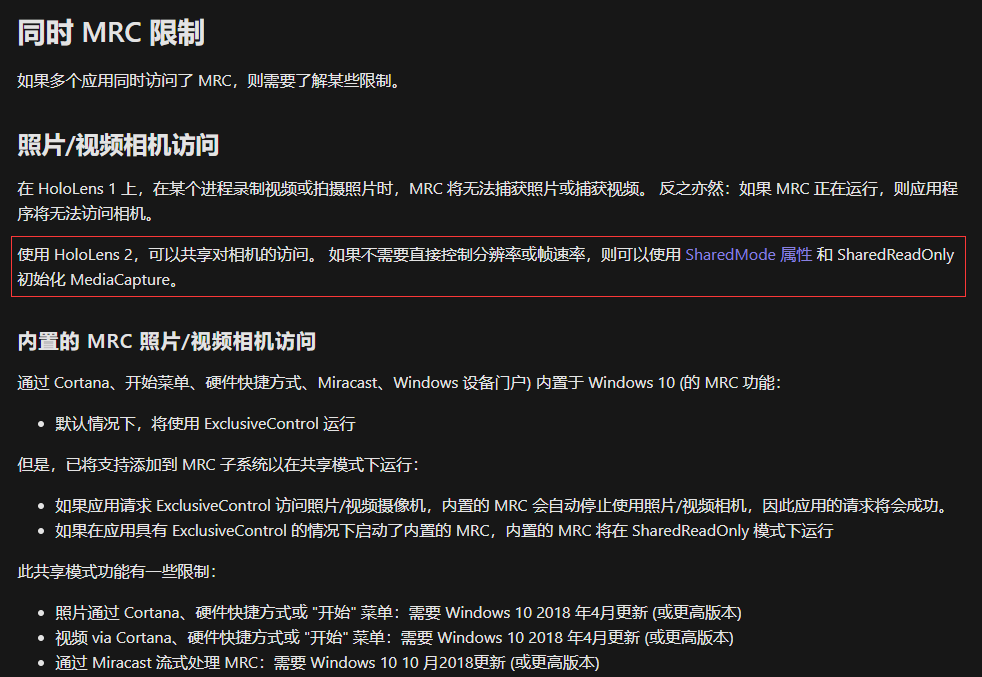
既然可以设置 SharedMode 属性来共享对相机的访问,那么 MixedReality-WebRTC 库对视频流的捕获到底是不是 SharedReadOnly 共享模式呢
开始细读 MixedReality-WebRTC 库提供的那些 Unity 脚本文件,终于,在 WebcamSource.cs 脚本中,发现了 SharedReadOnly 设置代码,如下
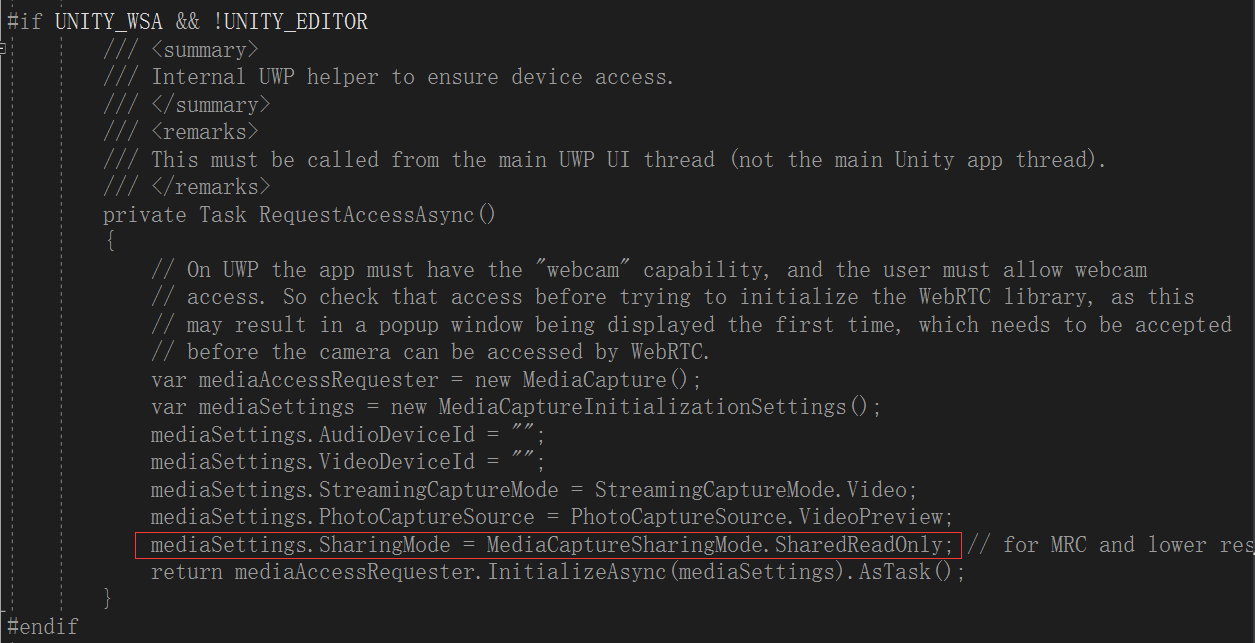
这下事情就很清楚了,MixedReality-WebRTC 库是以 SharedReadOnly 共享相机模式进行运行的,而 Unity 封装好的 Windows API 实现的图像捕获功能可能是以 ExclusiveControl 独占模式来捕获图像的,所以就造成了冲突。
而系统自带的拍照功能应该是以 SharedReadOnly 模式运行,所以就可以在实时音视频通讯的同时,来拍摄图像了
面向开发人员的 Mixed Reality 捕获 这篇文档还提到开发人员只需编写几行代码,即可使用 相机捕获 UI API 获取用户捕获的混合现实照片或视频。
所有的解决办法都指向了使用 UWP 原生 MediaCapture API 来使用图像捕获功能便可解决冲突
在经历了几个日夜的学习和踩坑后,终于成功解决问题,开心哈哈~~
# 关键代码
using System.Collections; | |
using System.Collections.Generic; | |
using UnityEngine; | |
using System; | |
using System.IO; | |
#if UNITY_WSA && !UNITY_EDITOR | |
using System.Threading.Tasks; | |
using global::Windows.UI.Core; | |
using global::Windows.Foundation; | |
using global::Windows.Media.Core; | |
using global::Windows.Media.Capture; | |
using global::Windows.ApplicationModel.Core; | |
using global::Windows.Storage; | |
using global::Windows.Storage.Streams; | |
using global::Windows.Graphics.Imaging; | |
using global::Windows.Media.MediaProperties; | |
using global::Windows.Storage.FileProperties; | |
#endif | |
public class MediaCaptureUtil : MonoBehaviour | |
{ | |
public static MediaCaptureUtil Instance; | |
private void Awake() | |
{ | |
Instance = this; | |
} | |
private void CleanPreviousImages() | |
{ | |
string directoryPath = Path.Combine(Application.persistentDataPath, "StreetViewFolder"); | |
DirectoryInfo info = new DirectoryInfo(directoryPath); | |
var fileInfo = info.GetFiles(); | |
foreach (var file in fileInfo) | |
{ | |
try | |
{ | |
file.Delete(); | |
} | |
catch (Exception) | |
{ | |
Debug.Log($"Cannot delete file: {file.Name}"); | |
} | |
} | |
} | |
public void CaptureImage() | |
{ | |
// 清理过时的图片资源 | |
CleanPreviousImages(); | |
// 在 UWP 线程下捕获图片到文件 | |
#if UNITY_WSA && !UNITY_EDITOR | |
try | |
{ | |
// MediaCapture API 的调用只能运行在 UWP 线程下 | |
UnityEngine.WSA.Application.InvokeOnUIThread(() => CaptureImageByMediaCapture(), | |
waitUntilDone: true); | |
//UnityEngine.WSA.Application.InvokeOnUIThread(() => CaptureImageByCameraCaptureUI(), | |
// waitUntilDone: true); | |
} | |
catch (Exception ex) | |
{ | |
Debug.LogError($"Camera access failure: {ex.Message}."); | |
return; | |
} | |
#endif | |
// 延迟 1s 执行,确保图片已成功捕获到文件 | |
StartCoroutine(Delay(1, () => | |
{ | |
// 从文件中读取图片,转为字节数组 | |
string filePath = Path.Combine(Application.persistentDataPath, "StreetViewFolder/Photo.jpg"); | |
byte[] imageBytes = GetImageAsByteArray(filePath); | |
// 自定义视觉分析 | |
if (imageBytes != null) | |
{ | |
StartCoroutine(ImageProcessor.Instance.AnalyseLastImageCaptured(imageBytes)); | |
} | |
else | |
{ | |
LogManager.Instance.PrintError("failed to read the specified image"); | |
} | |
})); | |
} | |
private byte[] GetImageAsByteArray(string imageFilePath) | |
{ | |
using (FileStream fileStream = new FileStream(imageFilePath, FileMode.Open, FileAccess.Read)) | |
{ | |
using (BinaryReader binaryReader = new BinaryReader(fileStream)) | |
{ | |
return binaryReader.ReadBytes((int)fileStream.Length); | |
} | |
} | |
} | |
private IEnumerator Delay(float second, Action OnFinished) | |
{ | |
yield return new WaitForSeconds(second); | |
OnFinished(); | |
} | |
#if UNITY_WSA && !UNITY_EDITOR | |
/// <summary> | |
/// 使用 MediaCapture API 捕获照片. | |
/// </summary> | |
/// <remarks> | |
/// This must be called from the main UWP UI thread (not the main Unity app thread). | |
/// </remarks> | |
async private void CaptureImageByMediaCapture() | |
{ | |
MediaCapture mediaCapture = new MediaCapture(); | |
var settings = new MediaCaptureInitializationSettings | |
{ | |
// 最重要的属性,使 MediaCapture 可以共享对相机的访问 | |
SharingMode = MediaCaptureSharingMode.SharedReadOnly | |
}; | |
await mediaCapture.InitializeAsync(settings); | |
// 将图片数据都保存到指定文件夹 | |
StorageFolder destinationFolder = await ApplicationData.Current.LocalFolder.CreateFolderAsync("StreetViewFolder", | |
CreationCollisionOption.OpenIfExists); | |
// 捕获图片 | |
using (var captureStream = new InMemoryRandomAccessStream()) | |
{ | |
await mediaCapture.CapturePhotoToStreamAsync(ImageEncodingProperties.CreateJpeg(), captureStream); | |
StorageFile file = await destinationFolder.CreateFileAsync("Photo.jpg", CreationCollisionOption.ReplaceExisting); | |
using (var fileStream = await file.OpenAsync(FileAccessMode.ReadWrite)) | |
{ | |
var decoder = await BitmapDecoder.CreateAsync(captureStream); | |
var encoder = await BitmapEncoder.CreateForTranscodingAsync(fileStream, decoder); | |
var properties = new BitmapPropertySet { | |
{ "System.Photo.Orientation", new BitmapTypedValue(PhotoOrientation.Normal, PropertyType.UInt16) } | |
}; | |
await encoder.BitmapProperties.SetPropertiesAsync(properties); | |
await encoder.FlushAsync(); | |
} | |
} | |
} | |
/// <summary> | |
/// 使用 CameraCaptureUI API 捕获照片. | |
/// </summary> | |
/// <remarks> | |
/// This must be called from the main UWP UI thread (not the main Unity app thread). | |
/// </remarks> | |
async private void CaptureImageByCameraCaptureUI() | |
{ | |
CameraCaptureUI captureUI = new CameraCaptureUI(); | |
captureUI.PhotoSettings.Format = CameraCaptureUIPhotoFormat.Jpeg; | |
captureUI.PhotoSettings.CroppedSizeInPixels = new Size(200, 200); | |
StorageFile photo = await captureUI.CaptureFileAsync(CameraCaptureUIMode.Photo); | |
StorageFolder destinationFolder = await ApplicationData.Current.LocalFolder.CreateFolderAsync("ProfilePhotoFolder", | |
CreationCollisionOption.OpenIfExists); | |
await photo.CopyAsync(destinationFolder, "ProfilePhoto.jpg", NameCollisionOption.ReplaceExisting).AsTask(); | |
await photo.DeleteAsync(); | |
} | |
#endif | |
} |
其中,上传图片数据到服务端代码可以参考 Hololens - 捕获照片到内存并上传至服务器(unity) 和 Hololens - 捕获照片成文件并上传至服务器(unity) 这两篇文章~
# 代码中的不足
虽然成功解决了问题,但现在代码中还是有点小不足的
主要就是图片捕获是在 UWP 线程下运行的,而读取捕获的图片文件是在 Unity 线程下运行的,这就涉及到线程的通信问题了
我在代码中为了确保图片数据已经被刷存到了文件中,只是简单的延迟了 1s 后才去读取图片数据,这里应该会有更好的处理办法,但由于知识所限,就只能先这样了,如果有更好的处理办法,欢迎给我留言~
学无止境哈哈哈