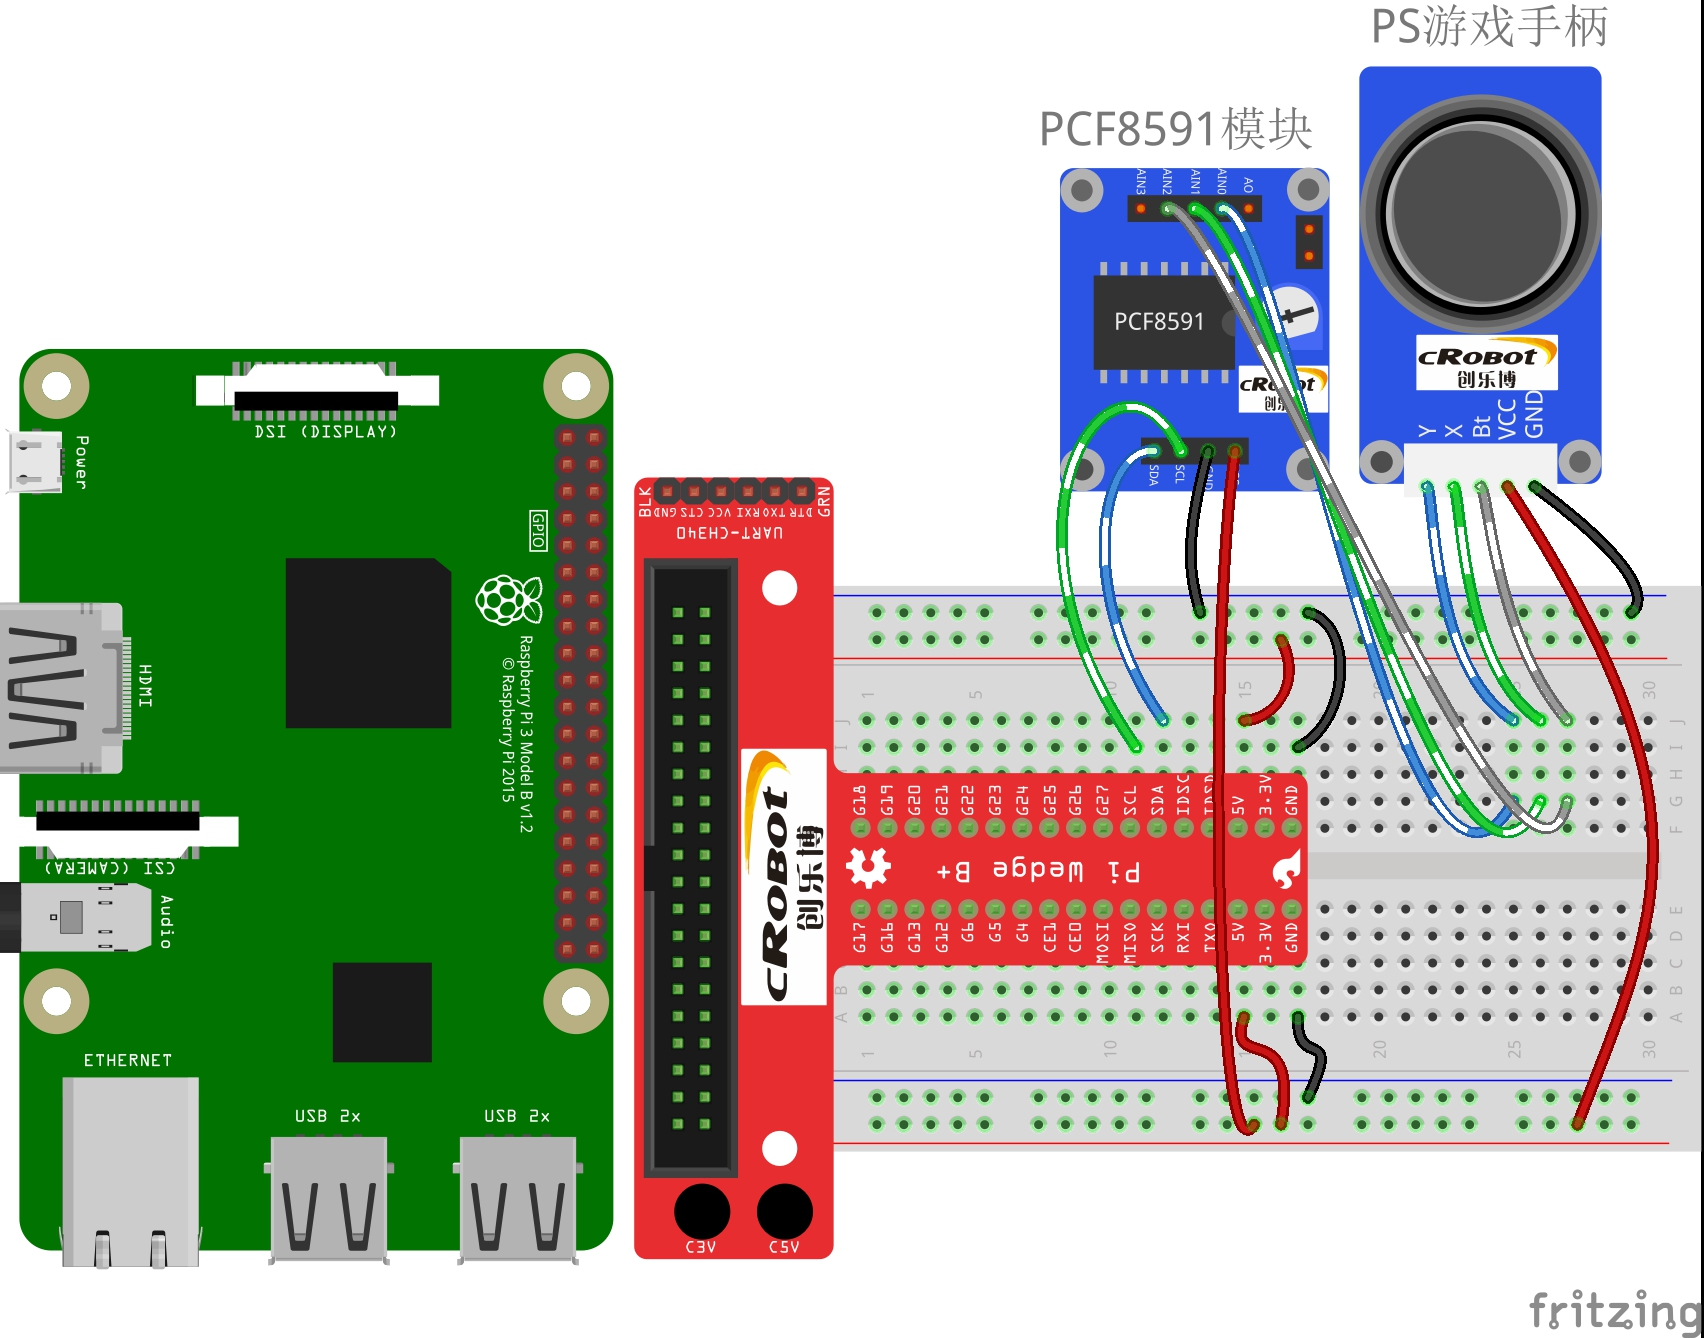
# 接线图
# 树莓派管脚图

# 代码
# C
#include <stdio.h> | |
#include <wiringPi.h> | |
#include <pcf8591.h> | |
#define PCF 120 | |
#define uchar unsigned char | |
int AIN0 = PCF + 0; | |
int AIN1 = PCF + 1; | |
int AIN2 = PCF + 2; | |
char *state[6] = {"home", "up", "down", "left", "right", "pressed"}; | |
int direction(){ | |
int x, y, b; | |
int tmp; | |
x = analogRead(AIN1); | |
y = analogRead(AIN0); | |
b = analogRead(AIN2); | |
if (y == 0) | |
tmp = 1; // up | |
if (y == 255) | |
tmp = 2; // down | |
if (x == 255) | |
tmp = 3; // left | |
if (x == 0) | |
tmp = 4; // right | |
if (b == 0) | |
tmp = 5; // button preesd | |
if (x-125<15 && x-125>-15 && y-125<15 && y-125>-15 && b == 255) | |
tmp = 0; // home position | |
return tmp; | |
} | |
int main (void) | |
{ | |
int tmp; | |
int status = 0; | |
wiringPiSetup (); | |
// Setup pcf8591 on base pin 120, and address 0x48 | |
pcf8591Setup (PCF, 0x48); | |
while(1) // loop forever | |
{ | |
tmp = direction(); | |
if (tmp != status) | |
{ | |
printf("%s\n", state[tmp]); | |
status = tmp; | |
} | |
} | |
return 0 ; | |
} |
编译命令: gcc joystick_PS2.c -o joystick_PS2 -lwiringPi
# Python
#!/usr/bin/env python | |
#------------------------------------------------------ | |
# | |
# This is a program for JoystickPS2 Module. | |
# | |
# This program depend on PCF8591 ADC chip. Follow | |
# the instruction book to connect the module and | |
# ADC0832 to your Raspberry Pi. | |
# | |
#------------------------------------------------------ | |
import PCF8591 as ADC | |
import time | |
def setup(): | |
ADC.setup(0x48) # Setup PCF8591 | |
global state | |
def direction(): #get joystick result | |
state = ['home', 'up', 'down', 'left', 'right', 'pressed'] | |
i = 0 | |
if ADC.read(0) <= 5: | |
i = 1 #up | |
if ADC.read(0) >= 250: | |
i = 2 #down | |
if ADC.read(1) >= 250: | |
i = 3 #left | |
if ADC.read(1) <= 5: | |
i = 4 #right | |
if ADC.read(2) == 0: | |
i = 5 # Button pressed | |
if ADC.read(0) - 125 < 15 and ADC.read(0) - 125 > -15 and ADC.read(1) - 125 < 15 and ADC.read(1) - 125 > -15 and ADC.read(2) == 255: | |
i = 0 | |
return state[i] | |
def loop(): | |
status = '' | |
while True: | |
tmp = direction() | |
if tmp != None and tmp != status: | |
print tmp | |
status = tmp | |
def destroy(): | |
pass | |
if __name__ == '__main__': # Program start from here | |
setup() | |
try: | |
loop() | |
except KeyboardInterrupt: # When 'Ctrl+C' is pressed, the child program destroy() will be executed. | |
destroy() |
#!/usr/bin/env python | |
#------------------------------------------------------ | |
# | |
# This is a program for PCF8591 Module. | |
# | |
# Warnng! The Analog input MUST NOT be over 3.3V! | |
# | |
# In this script, we use a poteniometer for analog | |
# input, and a LED on AO for analog output. | |
# | |
# you can import this script to another by: | |
# import PCF8591 as ADC | |
# | |
# ADC.Setup(Address) # Check it by sudo i2cdetect -y -1 | |
# ADC.read(channal) # Channal range from 0 to 3 | |
# ADC.write(Value) # Value range from 0 to 255 | |
# | |
#------------------------------------------------------ | |
import smbus | |
import time | |
# for RPI version 1, use "bus = smbus.SMBus(0)" | |
bus = smbus.SMBus(1) | |
#check your PCF8591 address by type in 'sudo i2cdetect -y -1' in terminal. | |
def setup(Addr): | |
global address | |
address = Addr | |
def read(chn): #channel | |
if chn == 0: | |
bus.write_byte(address,0x40) | |
if chn == 1: | |
bus.write_byte(address,0x41) | |
if chn == 2: | |
bus.write_byte(address,0x42) | |
if chn == 3: | |
bus.write_byte(address,0x43) | |
bus.read_byte(address) # dummy read to start conversion | |
return bus.read_byte(address) | |
def write(val): | |
temp = val # move string value to temp | |
temp = int(temp) # change string to integer | |
# print temp to see on terminal else comment out | |
bus.write_byte_data(address, 0x40, temp) | |
if __name__ == "__main__": | |
setup(0x48) | |
while True: | |
print 'AIN0 = ', read(0) | |
print 'AIN1 = ', read(1) | |
tmp = read(0) | |
tmp = tmp*(255-125)/255+125 # LED won't light up below 125, so convert '0-255' to '125-255' | |
write(tmp) | |
# time.sleep(0.3) |