# 环境
- Python:3.6.5 OpenCV 4.1.2
- C++:OpenCV 4.1.2
- JS:OpenCV 4.5.0
环境搭建可参考:B 站视频
# 知识点
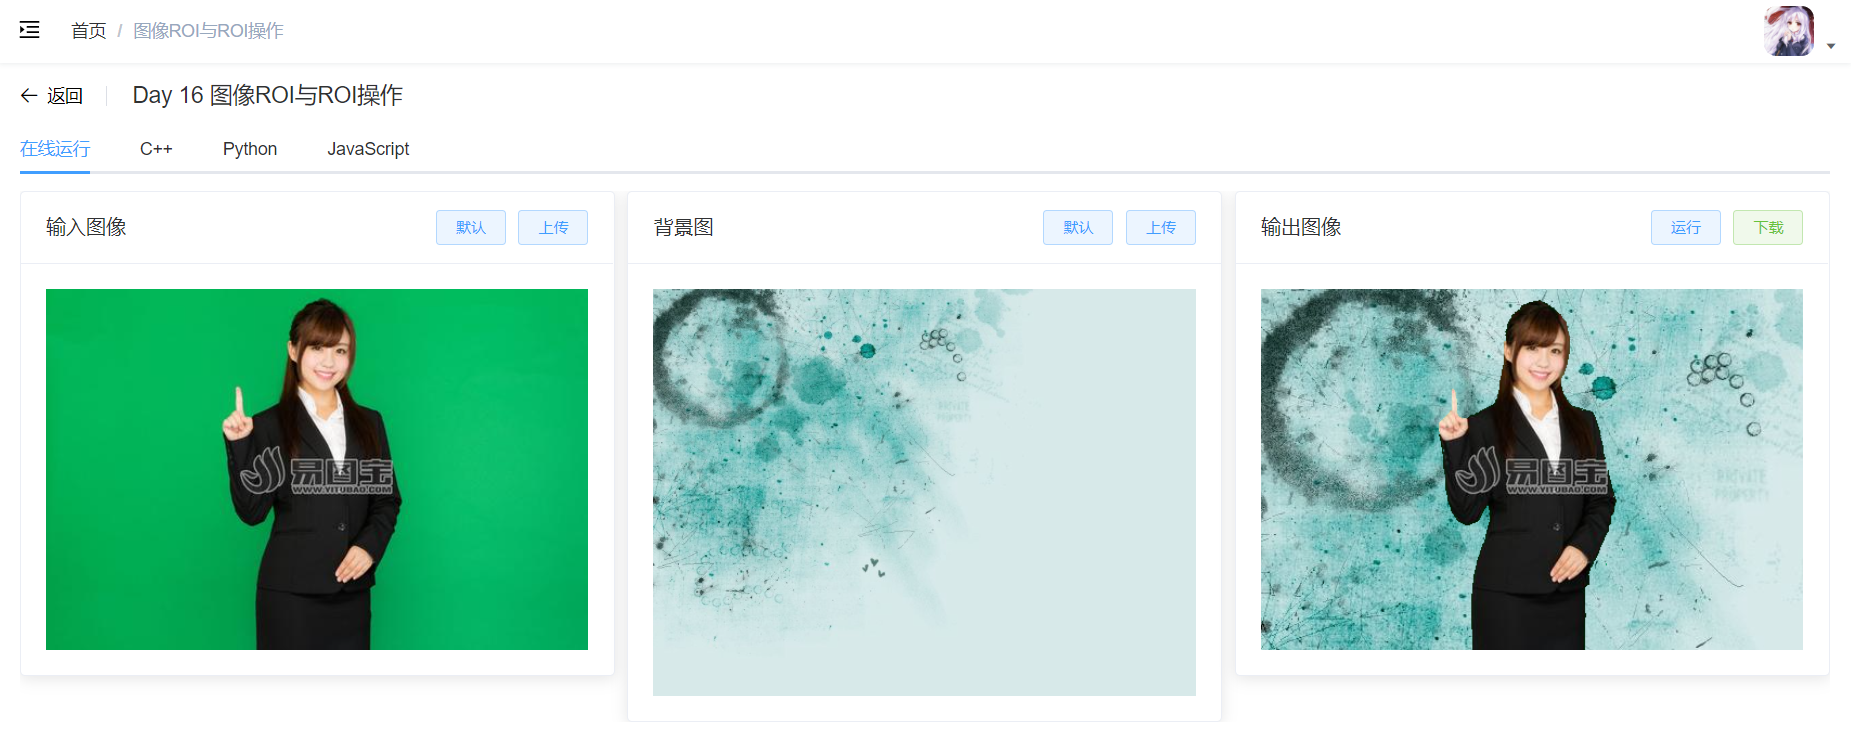
图像的 ROI (region of interest) 是指图像中感兴趣区域、在 OpenCV 中图像设置图像 ROI 区域,实现只对 ROI 区域的操作。
提取不规则 ROI 区域的一般步骤:
- 通过 inRange 函数生成 mask
- 通过按位与操作提取 ROI
# C++ 代码
#ifndef DAY16
#define DAY16

#include <opencv2/opencv.hpp>
#include <iostream>

using namespace std;
using namespace cv;

void day16() {

	Mat src = imread("E:\\_Image\\OpenCVTest\\scene.jpg");
	namedWindow("input", WINDOW_AUTOSIZE);
	imshow("input", src);
	int h = src.rows;
	int w = src.cols;

	// 获取ROI
	int cy = h / 2;
	int cx = w / 2;
	Rect rect(cx - 100, cy - 100, 200, 200);
	Mat roi = src(rect);
	imshow("roi", roi);

	Mat image = roi.clone();
	// 直接更改ROI,因为是直接赋值的,指向同一块内存区域,所以原图也会被修改
	roi.setTo(Scalar(255, 0, 0));
	imshow("result", src);

	// 更改拷贝的ROI,指向不同的内存区域,所以原图不受影响
	image.setTo(Scalar(0, 0, 255));
	imshow("result2", src);
	imshow("copy roi", image);

	// 获取不规则形状的ROI,通过inRange函数
	Mat src2 = imread("E:\\_Image\\OpenCVTest\\tinygreen.jpg");
	imshow("src2", src2);
	Mat hsv, mask;
	cvtColor(src2, hsv, COLOR_BGR2HSV);
	inRange(hsv, Scalar(35, 43, 46), Scalar(77, 255, 255), mask);
	imshow("mask", mask);

	// 通过mask提取人物部分,即我们的ROI。mask的白色区域才会执行与操作,黑色区域不执行
	Mat person;
	bitwise_not(mask, mask);
	bitwise_and(src2, src2, person, mask);
	imshow("person", person);

	// 生成一张蓝色背景
	Mat result = Mat::zeros(src2.size(), src2.type());
	result.setTo(Scalar(255, 0, 0));

	// 将蓝色背景与ROI融合
	Mat dst;
	bitwise_not(mask, mask);
	bitwise_or(result, result, dst, mask);
	add(dst, person, dst);

	imshow("dst", dst);

	waitKey();
}

#endif // !DAY16
# JS 代码
onOpenCvReady() { | |
// 官方文档链接:https://docs.opencv.org/4.5.0/de/d06/tutorial_js_basic_ops.html | |
// 官方文档链接:https://docs.opencv.org/4.5.0/db/d64/tutorial_js_colorspaces.html | |
const cv = window.cv | |
const src = this.createMat(cv, 'source', { name: 'imageSrcRaw' }) | |
// 转化到 HSV 色彩空间 | |
const hsv = this.createMat(cv, 'empty') | |
cv.cvtColor(src, hsv, cv.COLOR_RGB2HSV) | |
// 获取背景蒙版,即绿幕部分为白,前景人物部分为黑 | |
const mask = this.createMat(cv, 'empty') | |
const low = this.createMat(cv, 'options', { | |
rows: src.rows, | |
cols: src.cols, | |
type: cv.CV_8UC3, | |
initValue: [35, 43, 46, 255] | |
}) | |
const high = this.createMat(cv, 'options', { | |
rows: src.rows, | |
cols: src.cols, | |
type: cv.CV_8UC3, | |
initValue: [77, 255, 255, 255] | |
}) | |
cv.inRange(hsv, low, high, mask) | |
// 蒙版取非,即前景人物部分为白色 | |
const mask_not = this.createMat(cv, 'empty') | |
cv.bitwise_not(mask, mask_not) | |
// 利用蒙版,将人物部分抠出 | |
const people = this.createMat(cv, 'empty') | |
cv.bitwise_and(src, src, people, mask_not) | |
// 取一张背景图,并截取与 mask 相同尺寸的部分 | |
const scene = this.createMat(cv, 'source', { name: 'imageSrcRaw2' }) | |
if (scene.cols < people.cols || scene.rows < people.rows) { | |
this.$message.error('背景图的尺寸必须大于等于输入图像的尺寸') | |
// 销毁所有 mat | |
this.destoryAllMats() | |
return | |
} | |
const rect = new cv.Rect(0, 0, people.cols, people.rows) | |
let dstScene = this.createMat(cv, 'empty') | |
dstScene = scene.roi(rect) | |
// 利用蒙版,在背景图中扣掉待填充的人物蒙版部分 | |
const sceneBackground = this.createMat(cv, 'empty') | |
cv.bitwise_and(dstScene, dstScene, sceneBackground, mask) | |
// 或操作,将人物融入背景图中 | |
const finalImage = this.createMat(cv, 'empty') | |
cv.bitwise_or(sceneBackground, people, finalImage) | |
// 显示图像 | |
cv.imshow('canvasOutput', finalImage) | |
// 销毁所有 mat | |
this.destoryAllMats() | |
}, | |
createMat(cv, type, ops) { | |
switch (type) { | |
case 'source': | |
if (ops && ops.name) { | |
const mat = cv.imread(ops.name) | |
this.mats.push(mat) | |
return mat | |
} | |
break | |
case 'empty': { | |
const mat = new cv.Mat() | |
this.mats.push(mat) | |
return mat | |
} | |
case 'options': | |
if (ops && ops.rows && ops.cols && ops.type && ops.initValue) { | |
const mat = new cv.Mat(ops.rows, ops.cols, ops.type, ops.initValue) | |
this.mats.push(mat) | |
return mat | |
} | |
break | |
default: | |
break | |
} | |
}, | |
destoryAllMats() { | |
let i = 0 | |
this.mats.forEach(item => { | |
item.delete() | |
i++ | |
}) | |
this.mats = [] | |
console.log('销毁图象数:', i) | |
} |
# 结果展示